Monday, April 30, 2018

Visit to the Contemporary Jewish Museum

Yesterday morning, 17 of our JQuest fifth graders, together with parents and siblings, met on the plaza in front of the Contemporary Jewish Museum in San Francisco on a sunny morning.

The first thing that strikes me whenever I visit the Museum are the large signs hanging just to the side of the main entrance, advertising current and upcoming exhibits. Notice that admission is free to everyone on the first Tuesday of every month! I should also mention that on Sunday, June 10th this year, the entrance fee to the Museum will be waived in honor of the Museum's 10th birthday! 
Each Bar and Bat Mitzvah at Temple Isaiah is given the gift of a year's free membership, so we try to visit with our fifth graders each spring to introduce our students and their families to the Museum. This year our assigned docents were Tamara and Ruth (who is pictured above). Our group was large enough this year to be divided in half - Tamara took one group inside while Ruth and the second group began the tour outside.
As soon as we entered the Museum, Ruth brought our attention to the many globes hanging overhead, representing the fact that Jews have lived all over the world for at least two millenia. She also shared that there are Hebrew letters incorporated into the walls at various sites in the Museum - in the hallway she pointed out the letters "Pey" "Resh" Daled" and "Samech" which form the acronym "PARDES." The Hebrew word "pardes" itself is borrowed from old Persian and means "orchard." We get our English word "paradise" from pardes.
As we rounded the corner from the entrance hallway, we came upon a curious machine. What a wonderful introduction to the Rube Goldberg exhibit we had come to view.

Later on, after we had viewed the exhibit and were on our way to another exhibit upstairs, Ruth gave the students time to try out the machine themselves. They were absolutely fascinated by how it worked!

The first part of the exhibit explored drawings that R.G. had made describing machines he invented to perform the simplest of chores. 
Highlighted in a display case in this part of the exhibit was a book he'd written, as well as several hobby kits, games and puzzles relating to the machines he designed. Some of you may be familiar with the game "MouseTrap" which is also based on his ideas.
Above is a drawing of one of his more complicated machine designs. What I found interesting was learning from Ruth that R.G. never built any of the machines he designed - he only drew them for others to build. And build them they did. They were even featured in several movies (they showed segments of a Marx Brothers and a Charlie Chaplin film in which R.G.'s machines were featured, on a TV set in the exhibit room). 
R.G. was a cartoonist, and one of his series of cartoons was called, "Foolish Questions." For each foolish question, he had a sarcastic response, as above.  
At this point, Ruth handed out a series of cartoon panels to each student. One panel illustrated one of R.G.'s foolish questions, and the other panel had only the illustration. The students had to think up and write down the sarcastic response. 
They all found "comfortable" places to write their responses. I read a few of their responses, but was sworn not to divulge them to anyone.
R.G.'s father had been a sheriff of San Francisco. When Rube told him he wanted to train to be an artist, his father put his foot down and refused to allow him to do so. Instead, Rube attended U.C. Berkeley's engineering school, so it's not surprising that he would meld his artistic inclination with his engineering skills. Above, is a photo of the cover of a magazine from 1967 illustrated by R.G. The feature article's headline reads, "After Color TV? The future of home entertainment." It's eerie how prescient R.G. was when we think of all the entertainment devices used in our homes today.
As R.G. got older, it became difficult for him to draw multi-paneled cartoons. So he began to draw one-paneled political cartoons instead. The one above is from 1947.
And I'm sure all the adults could empathize with the message above.

After we went through the exhibit and after the students had time to play with the R.G. machine outside the exhibit hall, Ruth led us upstairs. First stop there was to show us the inside of the blue Cube we had seen from outside the Museum.

As soon as I walk into the Cube, I immediately feel "off-balance." No wall is completely straight. Even more overpowering to me are the 18 skylights situated on the "ceiling." 18 is the symbolic number in Judaism for "life" (the Hebrew letters "chet" and "yud" spell the word "Chai" which means life; the numerical equivalent of the two letters is 18).
Currently, there is an exhibit by an Israeli musician and composer named Kutiman in the Cube.
Around the corner from the Cube gallery, we were met by the oversized photograph above. Ruth introduced the second exhibit she wanted to share with us in front of this photo. The exhibit is called "Contraption: Rediscovering California Jewish Artists," and is composed of  the works of 16 artists, living and dead, whose work refers to the machine either literally or metaphorically.
Standing in front of the first piece in the exhibit, Ruth asked us to focus on one question as we viewed the artwork: How does each piece reveal the artist's relationship to machines in our lives - does the artist love the machine, hate it, or is there a love-hate relationship?
Here's a Bella Feldman painting - look at all that red color (danger?). 
There were some large "machines" in the exhibit as well. Below is contraption which looks like a horn connected to a large drum. Our students were told to make a loud noise through the end of the horn, then see what happened on the large drum:


And here is a fascinating installation made by Ned Kohn:


The students had an interesting experience with a door that made an eerie sound when you opened it, and only later became aware of the fact that when the door was opened, it caused a panel on the wall next to it, to flip around:


At one point, we passed by the "ultimate machine" - the human body.
The installation that took up the most room in this exhibit was one designed by Bernie Lubell. I call it "the knitting machine." This was an interactive piece, requiring 3 or 4 students to sit on a bench which was pressed down by their weight, thus beginning a series of movements, and 2 students to cycle to keep the machine working. Students took turns operating the machine, totally fascinated by it. You'll note in the video clip below that the end result is a beautifully knit tube of black yarn. The machine has been "knitting" the tube since the exhibit opened a few weeks ago, and will continue to do so until the exhibit closes on July 8th.


Once we had finished viewing the "Contraption" exhibit, Ruth led us downstairs to the art room, where we met the first group led by Tamara. Each group was assigned to a different set of tables, each set composed of separate tables. Once we were all gathered at our respective tables, each docent explained to their group what we would be working on. Here's Ruth explaining the project to our group:

And here's Tamara explaining it to her group:


For about 3/4 of an hour, the students and their parents and siblings became totally involved in designing Rube Goldberg-style machines out of everyday objects that they found on the tables as well as on tables at the back of the room. Below are sights and sounds of young minds and hands in the creative process, enjoying every minute.


Of course, there were frustrations along the way, but the students all persisted. As the saying goes, "If at first you don't succeed..."


"...try, try again!"


And parents also got involved!


Just before noon, it was time for the students in each group to learn if their individual projects which they had now connected on each table setting to the other projects, would go through all the steps they had devised for a "grand finale."

Here are Tamara's group's first steps:


And here is Ruth's group's "grand finale."


 BRAVO TO ALL OUR JQUEST RUBE GOLDBERGS!

AND A VERY BIG THANK YOU TO OUR TWO DOCENTS, TAMARA AND RUTH WHO BROUGHT THE EXHIBITS TO LIFE FOR US. YASHER KOACH!

Thursday, April 26, 2018

Yemenite Copper Wire Beaded Bracelets

As part of our unit of study about the Jews of Yemen, we learned that because Muslims refused to work with precious metals like gold or silver because it was considered a sin in Islam, it was the Jews of Yemen who became the jewelers. They became especially adept working with silver and copper.

On Tuesday and Wednesday this week, our Edot students had the opportunity to make copper wire beaded bracelets, simple versions of popular Yemenite jewelry. In doing so, they learned how to use the needle pliers, a basic tool for bending and shaping the wire. They also learned that jewelry was often a wearable talisman, used to keep away the djinni  that Arab Muslims believed caused disease and even death. According to pre-Muslim Arabic mythology, these djinni were attracted to shiny objects, and could be captured only inside of circular-shaped objects, since circles have no beginning and no end.

Thus, much Arab jewelry is decorated with round, shiny beads or coins to attract and then capture the evil spirits.

I set out containers filled with round wooden and glass beads.
The first step in making the bracelet was to take an 18" long, 24-gauge piece of copper wire, and then to grab one end of the wire with a pair of needle pliers and wind it six times around the pointed end of the tool.
It took only a few practice tries 'til the students caught onto the fact that you have to grip the wire's end tightly with the pliers even as you're winding the wire around the "needle" part of the tool.
After winding the wire six times around the pliers, you push the wire off the end of the pliers, then squeeze the resulting spiral as flat as you can using your fingers. Then it's time to choose 15 or more beads to string onto the opposite end of the wire.
Ideally, you would choose shiny, round beads to fit among any other beads you might find attractive for the bracelet.
Once you string on all the beads that can fit on the wire, it's time to follow the first two steps on the other end of the wire, leaving a little bit extra wire to shape into a hook with the pliers. 
And voila, you have a beautiful bracelet which doubles as a talisman to ward off those djinni that are always trying to cause trouble in our lives!
It's a perfect fit!
With all the djinni surrounding us, just one bracelet is probably not enough. (I wonder how many djinni fit into that big, brown bead on Phin's left wrist.)
Another proud Edot jeweler.
One to wear and one to bear.
And because it's so much fun to make, I had plastic bags available for students to take more beads and wire home to make more bracelets (hmmm - I wonder if any Edot mothers will be sporting new bracelets come Mother's Day!).
I'm looking forward to seeing many of our fifth graders at the Contemporary Jewish Museum on Sunday morning. I've been advised that our art project there will involve making our own Rube Goldberg-inspired chain reaction machines from wacky everyday objects. I, for one, can hardly wait!!!

Monday, April 23, 2018

Jews of Yemen

Yesterday morning, I introduced the students to the final edah (Jewish Diaspora community) that we'll be studying this year - the Jews of Yemen. In the Bible, Yemen is referred to as "Teiman," which is the Biblical Hebrew word for "south." It's not surprising that the area (and now the country) should be referred to as Teiman, since it's located on the southernmost tip of the Arabian Peninsula.

I introduced the edah by playing a YouTube video. Just before playing it, I asked the students to focus on the way the Yemenite Jews in the video look and dress, what they do for a living and also on the geology of the country.

After watching the video and sharing the students' impressions, I handed out copies of pages taken from a unit of study of the "The Israel Connection," published by the Jewish Educational Service of North America, Inc. in New York. The unit of study is called "One People, Many Faces," and the readings were taken from a chapter about the Yemenite Jews. We read together about the long history of this edah (going back some 3,000 years according to many scholars), and how their relationships with their Arab neighbors deteriorated with the rise of Islam in the 7th century C.E.. We learned that they were tolerated by the Yemenite Muslims because according to Islamic law, Muslims are not allowed to produce jewels and coins. The Jews thus became the jewelers of the Yemenite Arabs, especially famous for their outstanding work in copper and silver. We also read about Operation Magic Carpet, during which the Israeli government secretly evacuated thousands of Yemenite Jews to Israel.

I then shared with the students that when the Jews of Yemen heard about the destruction of the Second Temple in Jerusalem back in 70 C.E., they began to wear black armbands and vowed never to play musical instruments again until the Third Temple was built. A unique style of music and dance resulted from this oath which has greatly influenced Israeli music and dance. With that in mind, I used the rest of the session for playing a video titled, "Teiman: Music of the Yemenite Jews." It's on YouTube, and is divided into 3 separate parts:  Part 1Part 2 and Part 3.

During the coming weekday sessions, the students will "become" Yemenite jewelers, learning how to use the tools of the craft to make Yemenite copper wire beaded bracelets.

During our Hebrew Through Movement session yesterday, we reviewed vocabulary introduced since the start of the year, and then I introduced vocabulary associated with the upcoming holiday of Shavuot: har seenai (Mt. Sinai), beekooreem (first fruits), and aron ha'kodesh (the Holy Ark).


David, l'hatzbee'a al ha't'moona shel har seenai. (David, point to the picture of Mt. Sinai.)
Michael, l'hareem sal shel beekooreem. (Michael, lift up a basket of first fruits.)
And what's a Hebrew Through Movement session without some fun?!


This coming Sunday, all of our 5th graders and their families are invited to join me on a field trip to the Contemporary Jewish Museum, where our assigned docents will lead us through the Rube Goldberg Exhibit and then guide us through an art project relating to it. We'll be meeting in front of the Museum at 9:45 a.m.; the tour will begin at 10 a.m. and at 11 a.m. we'll go to the art room for the art project which will end at noon. I hope you can join us! Please let me know asap if you haven't already.  And while our fifth grade families are at the Museum, our sixth graders and their families will meet with Rabbi Greninger and other clergy for the final B'nai Mitzvah family workshop, from 10:30-12:30.

Friday, April 20, 2018

Celebrating Yom Ha'atzmaut

During our past two weekday sessions, our Edot class celebrated Israel's 70th birthday (which Israel itself celebrated yesterday). We began the session upstairs in the Oneg Room, preparing an Israeli vegetable salad.

As usual, we began the cooking session around the demo table, where Karen demonstrated the best methods for slicing and dicing the main ingredients (English and Persian cucumbers, Roma tomatoes, scallions and red bell peppers). Notice the Israeli flags decorating the wall behind us. The Israeli vegetable salad, with its fresh vegetables diced into very small pieces which blend together in your mouth, is one of the most quintessential foods found on Israeli tables today. Many Israelis have told me that this salad represents Israeli society, in that all its immigrants from different parts of the world came to Israel with their various cultures, and blended these into a new Israeli culture.
Here are the separate ingredients, washed and ready on their cutting boards. (You can catch a little peek of a Roma tomato hiding behind the bowl.)
And once the vegetables were all sliced and diced, students were directed to bring the bowl up to the demo table, where olive oil, lemon juice, salt and pepper were ready to be added in.

Then the cutting, slicing and dicing began. Charlie is slicing the scallions here into the smallest pieces possible. Did you know that the word "scallion" (also known as green onion), is derived from the Israeli city of Ashkelon? Per Wikipedia:The words scallion and shallot are related and can be traced back to the Greek ασκολόνιον ('askolonion') as described by the Greek writer Theophrastus. This name, in turn, seems to originate from the name of the ancient Canaan city of Ashkelon. 
Here's Brody beginning to slice the English cucumber.
After slicing it, it was time to dice it into the smallest pieces possible. 
Karen and I are helping (I'm holding down the cutting board for Dylan as he dices the tomato, while Karen slices the scallions), since we lost several fifth grade students from all 3 tracks this week to Outdoor Ed.
Even my Tuesday T.A., Eliana, gave a helping hand.
And when all 4 vegetables at each table were sliced and diced and put into the bowl, the result was colorful and certainly mouth-watering.
Once the olive oil, lemon juice, salt and pepper were added in, it was time to spoon the salad into the bowl and enjoy every mouth-watering bite. In Israel, it's often served in the mornings as part of  a hearty Israeli breakfast, along with bread, cheese and yogurt and perhaps an egg. It's also eaten as a snack or as a dinner side dish. Many Israelis keep a bowl of the salad on their kitchen counters or tables, and constantly refill it as it begins to empty. 
After tefillah and hafsaka (recess), it was time to go to our Edot classroom. There, we reviewed what we had learned about the three Edot we'd studied this year, with a focus on how many members of these Edot and, in some cases like Iraq, the entire edah, made difficult journeys to the Jewish Homeland, especially during the latter part of the 19th and early part of the 20th centuries. We also reviewed what we learned last week about the Holocaust, and how so many Jews were displaced with no home to return to after the Second World War ended.

At this point, I shared a "Heritage" video segment that described the return of Jews to Israel just prior to and after the establishment of the new State. (Unfortunately, this segment is part of the final chapter in the "Heritage" program called "Into the Future," which is not yet available on Youtube for me to share with you.) It described how Yemenite Jews were brought to Israel during the "Magic Carpet" operation between 1948-1951, how Iraqi Jews and Jews of other Arab countries were also evacuated from Arab countries at war with the new State. It introduced the "kibbutz" and the ideals of Ben Gurion, Israel's first prime minister, and the early "chalutzim" (pioneers) to work the land and bring it back to its former glory. And I played "Heritage" multimedia presentations for the students which shared the solution early Israeli educators developed for teaching Hebrew to so many immigrants (the Ulpan - immersion - technique), how children became language teachers for their parents, and finally, how the Israeli version of "Sesame Street" (Rechov Sumsum) and the Palestinian version of the same (Shara'a Simsim) worked together to create episodes featuring a 3-year old Israeli Jewish girl muppet (Dafi) and a 3-year old Palestinian girl muppet (Hannin) teaching each other their language and realizing how much more they had in common with each other culturally than they realized. (We watched the episode titled, "Felafel is the Same in any Language.")

And when I had finished the presentation, we discussed what Israel meant to those Jews returning to their homeland. I then asked the students what Israel meant to them. We talked about how we've been lucky living in a land that accepted us and allowed us to have equal rights and opportunities to become who we want to be. Most of the students thought they would never go to live in Israel, though many were excited about the chance to visit - especially those whose families are planning to travel to Israel with Rabbi Miller for their b'nai mitzvah next year.

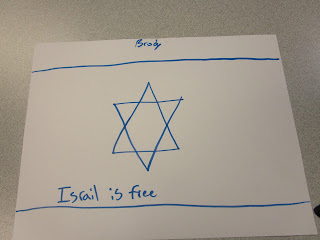
As a final activity, each student was given a piece of white paper and a blue marker. I then began speaking only in Hebrew, giving commands to the students to draw a blue line on the top of the white paper (l'tzayer kav kachol al ha'neeyar ha'lavan l'mala), then a blue line on the bottom of the page (l'tzayer kav kachol al ha'neeyar ha'lavan l'mata), and then to draw a blue triangle in the middle of the two lines (l'tzayer m'shoolash kachol b'emtza shnei ha'kaveem), and finally to draw an upside down blue triangle on top of the first triangle (l'tzayer m'shoolash kachol ha'fooch me'al ha'm'shoolash ha'reeshon). I then held up one student's drawing and said, "Degel Kachol Lavan" (a blue white flag). This is the name of the Israeli flag - the "Kachol Lavan." (Reverting back to English, I asked the students if they knew the name of the flag of the U.S.A.. Most responded, "Stars and Stripes." Actually, it's "Old Glory.")

Then, in English, I asked the students to think carefully about our previous discussion, and to write one sentence on the flag they had just drawn which would answer the question, "What Does Israel Mean to Me?"  Below are the results:


This coming Sunday, we'll be taking a more detailed look at the history and culture of the Jews of Yemen - the fourth and final edah that we'll be studying this year.